Install the app
How to install the app on iOS
Follow along with the video below to see how to install our site as a web app on your home screen.
Nota: This feature may not be available in some browsers.
Je gebruikt een verouderde webbrowser. Het kan mogelijk deze of andere websites niet correct weergeven.
Het is raadzaam om je webbrowser te upgraden of een alternatieve webbrowser te gebruiken.
Het is raadzaam om je webbrowser te upgraden of een alternatieve webbrowser te gebruiken.
Zeehaen - 1:37.5 - From Dutch Explorer Abel J. Tasman
- Topicstarter Marcus Botanicus
- Startdatum
-
- Tags
- abel tasman fluit zeehaen
Stephan Kertész
Forum veteraan
echt wel. Ik mag af en toe een stukje kers of eiken bietsen bij de plaatselijke meubelmaker. En dan wil hij ook nog eens munten ervoor terug.
Vroeger veel nieuwe bouw bezocht. Huizen dit net afwaren en dan lag er overal hout. Grenen en triplex. Niet het mooiste hout maar en lukte toch.
Marcus
Marcus
Wale installation.
So that the wale would follow the curve of the Fluit, I created 1cm long blocks with a hole in it. The hole is for a push pin.

I line up a block to where the bottom edge of the walnut plank is to be. All blocks are push pinned Into a bulkhead.

Then I get 2 pieces of 2mm thick by 6mm wide by 50cm long walnut planks (soaked for several days in water) and slowly bend and push against the block each of the plank along the curve of the Fluit. The planks overlap and somewhere I lay them on top of each other and cut several notches so they will lay tightly together.


This is the most challenging part of building the Fluit. Once that is done, the rest of the planking will be easy to install.
Installed more wales on the hull. There are 5 wales on each side.

Three wales equally spaced.

Stern

Bow
Wales:
There will be 3 strips of 2mm thick glued on top of each other. Each wale will be 6mm thick and the wood is walnut.

The rest of the ship:
1st planking layer is basswood and second layer is cherry. What I like about cherry is that it darkens over time.
Marcus
So that the wale would follow the curve of the Fluit, I created 1cm long blocks with a hole in it. The hole is for a push pin.
I line up a block to where the bottom edge of the walnut plank is to be. All blocks are push pinned Into a bulkhead.
Then I get 2 pieces of 2mm thick by 6mm wide by 50cm long walnut planks (soaked for several days in water) and slowly bend and push against the block each of the plank along the curve of the Fluit. The planks overlap and somewhere I lay them on top of each other and cut several notches so they will lay tightly together.
This is the most challenging part of building the Fluit. Once that is done, the rest of the planking will be easy to install.
Installed more wales on the hull. There are 5 wales on each side.
Three wales equally spaced.
Stern
Bow
Wales:
There will be 3 strips of 2mm thick glued on top of each other. Each wale will be 6mm thick and the wood is walnut.
The rest of the ship:
1st planking layer is basswood and second layer is cherry. What I like about cherry is that it darkens over time.
Marcus
Bijlagen
Laatst bewerkt:
Mijn laatste post is helemaal verkeerd. Hoe kan ik dat veranderen?
Marcus
Marcus
On both sides of the Fluit the lower 3 wales have been glued on. The 1st upper wale is pinned to the hull and drying. Towards the stern this plank has to be bend in two different directions.

Lots of pins used, a "PIN FOREST"


Stern.
After the 3 lower wales with enough space between them for the 1st layer of planking, I should have done this differently.
After the 1st lower wale, I should have installed a strip of basswood next to it and then a strip of walnut, etc. Instead, I made little blocks and pinned those between the wales.
Complete Waste of Time!! Oh Well.......
Started planking the 1st layer with basswood started with strips next to the keel. I was going to follow the planking pattern from the Fluit pictures in the book but they are all different so I will follow the pattern from the Boyer which is similar to Fluit planking.

Marcus
Lots of pins used, a "PIN FOREST"
Stern.
After the 3 lower wales with enough space between them for the 1st layer of planking, I should have done this differently.
After the 1st lower wale, I should have installed a strip of basswood next to it and then a strip of walnut, etc. Instead, I made little blocks and pinned those between the wales.
Complete Waste of Time!! Oh Well.......
Started planking the 1st layer with basswood started with strips next to the keel. I was going to follow the planking pattern from the Fluit pictures in the book but they are all different so I will follow the pattern from the Boyer which is similar to Fluit planking.
Marcus
TIMBERWOLF
Forum veteraan
geluksvogel gratis hout dat wil iedereen wel
pietsan
Forum veteraan
Je kan een verkeerd of fout bericht laten verwijderen door op de blauwe knop 'meld' te drukken links onder ieder bericht. er verschijnt dan een pop-up waar je aangeeft dat het bericht niet goed is waarna het word verwijderd door één van de moderators.Mijn laatste post is helemaal verkeerd. Hoe kan ik dat veranderen?
Marcus
")
More planking of the 1st layer. Planking the area between the stern and where the poop deck is to be placed is a challenge. Basswood soaked for 4 days to get it thoroughly wet, then slowly bending it 2 ways and pinning it down with pushpin. Lots of pins used.
It is a tedious process.


Here is some more planking , the walnut shows where the wales are going to be.


It is a tedious process.
Here is some more planking , the walnut shows where the wales are going to be.
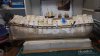
Finished the first layer of planking.


After thoroughly studying the lines plan and making templates in every combination, taking the templates and lining them up where they are supposed to be, I've come to the conclusion that everything checks out.
Just to make sure I checked every book, article and research paper that have pictures of Fluits and came to the conclusion that the models in the Merchant book are very different than some of the articles 'and' the Abel Tasman book.
Marcus
Up to this point everything seems OK. Then Ab Hoving gave me some advice.
Hello Marcus,
I want to make a few remarks about your planking. Sorry I didn't keep up with this thread but seeing your planking only now you deserve some clues because of your impressive drive to build this difficult model.
The first thing you should let go is thinking that a ship can be planked with straight strips from fore to aft. It is a wide-spread misunderstanding caused by kit makers that straight strips can plank a round model. In reality there is not a single straight plank in a ship's outside planking. Take wider strips and shape them according to the shape of the ship: they look like crooked sabres. Never force the wood, treat it gently and it will do what you want without splitting or breaking. Twisting wood in different directions for instance is a proces that can only be done by applying heat, and only after you have made sure that the piece of plank you are applying really fits its destination. You show my Zeehaen model from the pictures in the book, but if you really study those pictures, you should see that every strake of planking consists of at least three separate pieces of wood and mostly more. Bending wood with heat (for instance a flame of a candle) is a technique you can master if you apply pressure to the hot wood and feeling that it gives way at a certain moment. That's how you get the shape. If you can mount the plank without using force, that's when you are on the right track.
Secondly the mounting of the wales is, like you said yourself, crucial. If they are in the right location and have the right curve, very little can go wrong. Now look at your side view and ask yourself: is the curve of my whale flawless? I don't think you can say yes. You gave it a lot of attention, but you missed it slightly. A solution could be another technique: dress the unplanked hull with a wide strip of paper and draw the lines of the wales on it until you finally feel you have the shape right. Don't decide at once. Try to find a satisfying shape and put the model away for a few days. Then look at it again and repeat the proces. If you are satisfied with the run, take off the paper and cut the wales. You will see how curved the shape is. It also helps measuring if you draw a waterline on the unplanked hull for reference.
It diminishes the problem of orientation and gives you a landmark to work from.
This is really challenging stuff. I can honestly tell you that I'm wrestling with the shape of the hips of fluits up to today, even though I built quite a few. Recently I was trying my hand on a 'wadconvooier', a small armed admiralty vessel, used to protect merchants on the 'Zuiderzee'. It is not a ship type, but rather a function, for which several types were used. One of them really looks like a fluit, but shows another type of rig. I thought I could use old plans for another fluit I made by rescaling the draught. I was wrong. The result was another candidate for the dustbin where it is now, because the hips were placed too low:


Finding the right curves is the most challenging part of the proces. And there is only one way to learn: the hard way.
Edited December 21, 2019 by Ab Hoving
Hello Marcus,
I want to make a few remarks about your planking. Sorry I didn't keep up with this thread but seeing your planking only now you deserve some clues because of your impressive drive to build this difficult model.
The first thing you should let go is thinking that a ship can be planked with straight strips from fore to aft. It is a wide-spread misunderstanding caused by kit makers that straight strips can plank a round model. In reality there is not a single straight plank in a ship's outside planking. Take wider strips and shape them according to the shape of the ship: they look like crooked sabres. Never force the wood, treat it gently and it will do what you want without splitting or breaking. Twisting wood in different directions for instance is a proces that can only be done by applying heat, and only after you have made sure that the piece of plank you are applying really fits its destination. You show my Zeehaen model from the pictures in the book, but if you really study those pictures, you should see that every strake of planking consists of at least three separate pieces of wood and mostly more. Bending wood with heat (for instance a flame of a candle) is a technique you can master if you apply pressure to the hot wood and feeling that it gives way at a certain moment. That's how you get the shape. If you can mount the plank without using force, that's when you are on the right track.
Secondly the mounting of the wales is, like you said yourself, crucial. If they are in the right location and have the right curve, very little can go wrong. Now look at your side view and ask yourself: is the curve of my whale flawless? I don't think you can say yes. You gave it a lot of attention, but you missed it slightly. A solution could be another technique: dress the unplanked hull with a wide strip of paper and draw the lines of the wales on it until you finally feel you have the shape right. Don't decide at once. Try to find a satisfying shape and put the model away for a few days. Then look at it again and repeat the proces. If you are satisfied with the run, take off the paper and cut the wales. You will see how curved the shape is. It also helps measuring if you draw a waterline on the unplanked hull for reference.
It diminishes the problem of orientation and gives you a landmark to work from.
This is really challenging stuff. I can honestly tell you that I'm wrestling with the shape of the hips of fluits up to today, even though I built quite a few. Recently I was trying my hand on a 'wadconvooier', a small armed admiralty vessel, used to protect merchants on the 'Zuiderzee'. It is not a ship type, but rather a function, for which several types were used. One of them really looks like a fluit, but shows another type of rig. I thought I could use old plans for another fluit I made by rescaling the draught. I was wrong. The result was another candidate for the dustbin where it is now, because the hips were placed too low:
Finding the right curves is the most challenging part of the proces. And there is only one way to learn: the hard way.
Edited December 21, 2019 by Ab Hoving
I have seen his card models on modelshipworld and they are amazing. From small merchant ship to a Pinas.AB is al een tijd bezig met papieren modellen te bouwen en ze zien er ook erg mooi uit.
neem zijn advies te hand want hij weet echt wel waar hij het over heeft.
je hebt nog wel een beetje schuur werk te doen voor je de 2 de huid er op legt denk ik
Anything he mentions that I should do. I do that.
He is able to read ship building contracts and from there on he builds the ship. Once you know how to do that you can research any naval museum archive, download the contract and build the ship.
There is a contract in the 17th century Dutch merchant ships book about a plezierjacht. I spent some time understanding the process and I am still at step one. Not an easy thing to do.
Marcus
Ab is absolutely right about the whales. Get the first one right, as right as you can get it. It works easier for all the rest.
What worked for me, and what I copied from a lot of russian builders is using a styreen strip (the white plastic strips) They curve nicely when you bend them. Fix them with pins/nails. and its easy to correct if they don't run to your satisfaction.
Just a picture of my first lowest whale. First the styreen strip and then working the whale against it.
Just my 5 cnts.
.jpg")
What worked for me, and what I copied from a lot of russian builders is using a styreen strip (the white plastic strips) They curve nicely when you bend them. Fix them with pins/nails. and its easy to correct if they don't run to your satisfaction.
Just a picture of my first lowest whale. First the styreen strip and then working the whale against it.
Just my 5 cnts.
Styrene is a good idea. Thanks for letting me know. I have 2 mtr long pieces of cherry and maple veneer in my stash of wood. I cut a strip of that and used that to locate my wales.Ab is absolutely right about the whales. Get the first one right, as right as you can get it. It works easier for all the rest.
What worked for me, and what I copied from a lot of russian builders is using a styreen strip (the white plastic strips) They curve nicely when you bend them. Fix them with pins/nails. and its easy to correct if they don't run to your satisfaction.
Just a picture of my first lowest whale. First the styreen strip and then working the whale against it.
Just my 5 cnts.
Bekijk bijlage 361664
In my second layer of planking I will redo the walnut wale to let it flow better.
Marcus
Ab,
Thank you for the constructive criticism.
In your opinion do I need to remove the 1st layer of planking and start all over again?
If not, I am planking the 2nd layer per your instruction.
I did force the planks at the bow area.


I was trying to copy the planking of the models in the Merchant book. I usually don't do this. While planking my Utrecht and Boyer, no plank was forced.
You are correct about the three bottom installed wales. There is a slight curve from the stern to about the middle of the ship, then they are straight, going slightly up and ending in abrupt corners of the bow. I measured several times to where they were supposed to be and drew the lines on the bulkheads. I will definitely change this in the second planking and get a better curve towards the middle of the ship.

One can see from the area near the keel that the planks are not one piece. That is not possible.


Marcus
Thank you for the constructive criticism.
In your opinion do I need to remove the 1st layer of planking and start all over again?
If not, I am planking the 2nd layer per your instruction.
I did force the planks at the bow area.
I was trying to copy the planking of the models in the Merchant book. I usually don't do this. While planking my Utrecht and Boyer, no plank was forced.
You are correct about the three bottom installed wales. There is a slight curve from the stern to about the middle of the ship, then they are straight, going slightly up and ending in abrupt corners of the bow. I measured several times to where they were supposed to be and drew the lines on the bulkheads. I will definitely change this in the second planking and get a better curve towards the middle of the ship.
One can see from the area near the keel that the planks are not one piece. That is not possible.
Marcus
Glad you take it this way Marcus.
I didn't realize you planned a double planking. In that case I would do my best to sand the first planking up to a degree that nothing is left of the irregularities you caused by rather random planking. I would even go as far as using filler to get a smooth and even surface to lay the outer planking on.
You might consider a layer of white paint so you can draw the lines of the planking directly on the hull.
I don't know how you want to attach that planking. Just glue?
It may be a bit late for an advice, but I think the use of balsa wood for spacers between frames is rather useless. I don't consider balsa wood as wood. You cannot use nails or dowels in that stuff. Any kind of wood would have been better, as it would have given you the opportunity to choose the locations of nails or dowels. Now you can only use your plywood frames. Plywood is useless in modelbuilding too. Another fairytale from the kit business.
Where you stand now, you might just as well have built a solid hull, carving it into the right shape. Or you will have to give real building a try: Start with keel and posts and build your frames and planking like in the real thing. Have you read Harold Underhill's Plank-on-frame Models? I can recommend it.
Ab
Took drastic measures and removed the planking between bulkhead 5 and 10.


Redid the planking so they would extend way over the rudder.

Combination of wood glue and sawdust was used to fill in the gaps. Most of this will be sanded away.

Both sides are done and drying overnight.


I have been having a lot of trouble with the stern. When you look at the Fluit from the top and side there is nothing wrong. But when you look from where the tiller goes into the ship, there is a whole lot of wrong.
The ship overall has all the curves the way the plans show me and it all looks pleasing to the eye. Nothing is abrupt. The bottom 3 wales are placed correctly and the upper 2 need to be higher in the stern area than they are now. This will be done with the second layer of planking.
BUT (here it comes)
When I planked the bulkheads towards the stern, it didn't end up in a point above the rudder - see below-, that is the area that makes the boat look way off.

Top view. Tiller rests on the rudder post and you can see I am way off, by 12mm.
Have to figure out how I can move it all towards the middle.
I don't want to trash the model and start all over again or remove the planking from bulkheads 30 to 5.
One area where the tiller goes into the ship there is a 90 degree curve opening. It is bigger than the plans and what the pictures of Fluits in books show.
All in all the further I get into this build the more I think that I should have build the 'cat' first as it looks somewhat like a fluit. Setting that thought aside....... I will continue with this build.

Marcus
Redid the planking so they would extend way over the rudder.
Combination of wood glue and sawdust was used to fill in the gaps. Most of this will be sanded away.
Both sides are done and drying overnight.
I have been having a lot of trouble with the stern. When you look at the Fluit from the top and side there is nothing wrong. But when you look from where the tiller goes into the ship, there is a whole lot of wrong.
The ship overall has all the curves the way the plans show me and it all looks pleasing to the eye. Nothing is abrupt. The bottom 3 wales are placed correctly and the upper 2 need to be higher in the stern area than they are now. This will be done with the second layer of planking.
BUT (here it comes)
When I planked the bulkheads towards the stern, it didn't end up in a point above the rudder - see below-, that is the area that makes the boat look way off.
Top view. Tiller rests on the rudder post and you can see I am way off, by 12mm.
Have to figure out how I can move it all towards the middle.
I don't want to trash the model and start all over again or remove the planking from bulkheads 30 to 5.
One area where the tiller goes into the ship there is a 90 degree curve opening. It is bigger than the plans and what the pictures of Fluits in books show.
All in all the further I get into this build the more I think that I should have build the 'cat' first as it looks somewhat like a fluit. Setting that thought aside....... I will continue with this build.
Marcus