Install the app
How to install the app on iOS
Follow along with the video below to see how to install our site as a web app on your home screen.
Nota: This feature may not be available in some browsers.
Je gebruikt een verouderde webbrowser. Het kan mogelijk deze of andere websites niet correct weergeven.
Het is raadzaam om je webbrowser te upgraden of een alternatieve webbrowser te gebruiken.
Het is raadzaam om je webbrowser te upgraden of een alternatieve webbrowser te gebruiken.
KOLDERSTOK BATAVIA / HAARLEM
- Topicstarter Heinrich
- Startdatum
Tenzij het een Blue Nose is natuurlijkenne probeer daar te voorkomen dat er nog iets onze kant opkomt,
")
Wat die roosters betreft, is de vergissing begrijpelijk: op de tekening staan ze allemaal verkeerd afgebeeld ! Foutje? of zie ik het verkeerd?
Alvast ook een prettig eindejaar.
F
Flying Scotsman
Guest
Ziet er prima uit Heinrich of het nou wel of niet goed om is, ik had het niet gezien ")
Ook van mij alvast een prettige jaarwisseling
Ook van mij alvast een prettige jaarwisseling
Hans Groenenberg
Forum veteraan
Gelukkig nieuwjaar Heinrich. Inderdaad het jaar van de os en van jou en Anna
@Hans Groenenberg En n baie Gelukkig Nieuwjaar vir jou en jou famile, Hans!
Hallo Heinrich,
Als 1e de beste wensen voor een gezond en mooi bouwjaar!
Mooi dat je naast de Bluenose ook nog tijd hebt voor de Haarlem.
De tijd een. Beetje verdelen.
Als een Admiraal over een vloot schepen: Verdeel en heers!
Als je zelf niets had gezegd over dat foutje, dan ........
Ik vind het er strak uit zien.
Gr. Peter
@Pingu57
@peter voogt
Aan albei Peters! Baie dankie vir die Nieuwjaarswense gentlemen! Dieselfde vir julle en jul families!
@peter voogt
Aan albei Peters! Baie dankie vir die Nieuwjaarswense gentlemen! Dieselfde vir julle en jul families!
Hello Almal
From 6 o'clock this morning (it is now 23:59 in China), the day has been devoted to the Haarlem. The work today comprised of two sections. I wanted to start the verschansing of the fortuining on the Bakboord side and I wanted to see how far I could get with the galjoen.
To do the verschansing, the first step is to break off the spanten. This is done with a pair if fine-nosed pliers in pretty much the same way I would imagine a dentist pull teeth.
 Grasp the spant firmly, wiggle it a bit from side to side with increasing pressure until it snaps. Hopefully - if you are lucky - you get a clean break, other times you are left with a lot of work to do.

Dit is nou net mooi wat ons NIE wil he nie! However, all that is required is a good dose of patience, a very sharp X-Acto knife and a file.

Once the offending stujkes spant had been removed, we can now start the verscahnsing. These consists of a 3mm high and 4mm wide box which is built over the waterway and is placed at both the bottom and the top. The inner bracing consisting of 2mm x 3mm linden wood strips cut to size and which are glued to the bottom waterway box and to the inside of the fortuining. (Top photo)

This picture shows the one completed section of the verschansing being done with both top and bottom boxes installed. The ends are now trimmed to side and all that is left is to paint the whole concern black.

And that is what the finished assembly looks like. To the keen of eye - you will notice that there is a missing deck plank next to the waterway. When planking the deck, I leave these sections purposely unpainted so as not to run the risk of getting black paint on the deck planking. After the assembly has been completed, it is now just a case of gluing the appropriate deck plank into position.
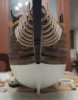
Then it was time to start the galjoen construction - and man oh man - this is no walk in the park. On the Batavia/Haarlem, the galjoen is mounted by means of galjoen spanten which will later be used for planking purposes as well. (The sides of the galjoen assembly get planked later on).

Here I have just dry-fitted the galjoen with 3 of the spanten. These spanten are relatively straightforward to fit as they consist of a single piece which is glued onto the bottom part of the galjoen.

The three "easy" spanten are mounted. Obviously you first need to determine their exact positioning by slotting them into their respective slots in the sides of the galjoen. The straight line indicates the flat surface you have to glue on the spanten - no problem. But the other five spanten are split into two pieces each and have to be mounted against the flat sections as indicated by the yellow circles. This means there is absolutely no purchase for the glue to adhere to. So, I drilled holes in the spanten and galjoen, used messing, then applied glue and inserted them that way. It worked BUT the alignment was a nightmare!

While waiting for the glue to dry, I was continuing work on the verschansing.
And so we carried on, until - at last - all the spanten had been glued to the galjoen. Then I carefully removed the actual galjoen and then it was time for the old PVA diluted with hot water trick.

With a brush I carefully applied the mixture along the joints and seams and allowed it plenty of time to dry properly. On this picture, it looks as if the two front spanten do not align nicely with each other, but once the galjoen is in place, you will see that it is a perfect fit.
WORD VERVOLG
From 6 o'clock this morning (it is now 23:59 in China), the day has been devoted to the Haarlem. The work today comprised of two sections. I wanted to start the verschansing of the fortuining on the Bakboord side and I wanted to see how far I could get with the galjoen.
To do the verschansing, the first step is to break off the spanten. This is done with a pair if fine-nosed pliers in pretty much the same way I would imagine a dentist pull teeth.
Dit is nou net mooi wat ons NIE wil he nie!
However, all that is required is a good dose of patience, a very sharp X-Acto knife and a file.Once the offending stujkes spant had been removed, we can now start the verscahnsing. These consists of a 3mm high and 4mm wide box which is built over the waterway and is placed at both the bottom and the top. The inner bracing consisting of 2mm x 3mm linden wood strips cut to size and which are glued to the bottom waterway box and to the inside of the fortuining. (Top photo)
This picture shows the one completed section of the verschansing being done with both top and bottom boxes installed. The ends are now trimmed to side and all that is left is to paint the whole concern black.
And that is what the finished assembly looks like. To the keen of eye - you will notice that there is a missing deck plank next to the waterway. When planking the deck, I leave these sections purposely unpainted so as not to run the risk of getting black paint on the deck planking. After the assembly has been completed, it is now just a case of gluing the appropriate deck plank into position.
Then it was time to start the galjoen construction - and man oh man - this is no walk in the park. On the Batavia/Haarlem, the galjoen is mounted by means of galjoen spanten which will later be used for planking purposes as well. (The sides of the galjoen assembly get planked later on).
Here I have just dry-fitted the galjoen with 3 of the spanten. These spanten are relatively straightforward to fit as they consist of a single piece which is glued onto the bottom part of the galjoen.
The three "easy" spanten are mounted. Obviously you first need to determine their exact positioning by slotting them into their respective slots in the sides of the galjoen. The straight line indicates the flat surface you have to glue on the spanten - no problem. But the other five spanten are split into two pieces each and have to be mounted against the flat sections as indicated by the yellow circles. This means there is absolutely no purchase for the glue to adhere to. So, I drilled holes in the spanten and galjoen, used messing, then applied glue and inserted them that way. It worked BUT the alignment was a nightmare!
While waiting for the glue to dry, I was continuing work on the verschansing.
And so we carried on, until - at last - all the spanten had been glued to the galjoen. Then I carefully removed the actual galjoen and then it was time for the old PVA diluted with hot water trick.
With a brush I carefully applied the mixture along the joints and seams and allowed it plenty of time to dry properly. On this picture, it looks as if the two front spanten do not align nicely with each other, but once the galjoen is in place, you will see that it is a perfect fit.
WORD VERVOLG

BAIE meet en pas, weer meet en weer pas later ...
En die finale produk.
Thank you all so much for watching and following. As always - I appreciate your comments and inputs. Please stay safe out there - look after yourselves and your loved ones and relish every chance that you get building!
Vriendelijke groet - Heinrich
Bijlagen

Stephan Kertész
Forum veteraan
Zo zie je maar, met geduld krijg je iets moois. En wat voor moois jij laat zien. 
TIMBERWOLF
Forum veteraan
