Install the app
How to install the app on iOS
Follow along with the video below to see how to install our site as a web app on your home screen.
Nota: This feature may not be available in some browsers.
Je gebruikt een verouderde webbrowser. Het kan mogelijk deze of andere websites niet correct weergeven.
Het is raadzaam om je webbrowser te upgraden of een alternatieve webbrowser te gebruiken.
Het is raadzaam om je webbrowser te upgraden of een alternatieve webbrowser te gebruiken.
KOLDERSTOK BATAVIA / HAARLEM
- Topicstarter Heinrich
- Startdatum
Stephan Kertész
Forum veteraan
ig kin 'r aug gein tau aan vastknuipe ")
Dear Friends
With the arrival of my Exacto knife, it was time to cut open the gunports in the stern assembly. I followed the Admiraal’s recommendation by drilling four small holes in each of the corners of the gunports, after which I traced lines between the holes with the “Exacto”. Then it was simply a case of filing the edges smooth and making sure that the borders line up with that of the rear bulkhead.
After that it was decision time. On the Batavia, the stern geschutpoorten are closed, but I had to think carefully about that. As mentioned before, the Haarlem had at least 32 cannons, as opposed to the 24* of the Batavia, which leaves me 8 cannons short. By installing two rearward-facing stern cannons, at least I would only have to find space somewhere for another 6. So, I decided that the stern geschutpoorten would remain open and the Haarlem would get two stern cannons.
* According to Willem Vos who constructed the Lelystadt replica and the Western Australia Museum, Fremantle, Western Australia, the Batavia originally had 30 cannons: 22 x iron; 6 x bronze and two composite guns. (The composite guns are a most interesting subject and story all on its own.)

The extremely limited space available between spanten 16 and 17 ruled out any possibility of a conventional cannon/rolpaard combination - it was clear that it would have to be “insteek” cannons such as the others on the Batavia. Measuring one of the cannons showed that it would fit into the space available, but how?
Borrowing from Kolderstok, I used their cannon box concept, but modified it considerably. Because of the angle of spant 1#7, I would have to turn the box upside down and match its sidewalls perfectly to that of the spant. I also opted to build a considerably bigger and MUCH more bulky box, so that if I had to, I could manoeuvre it around to ensure perfect alignment with the cut-open gun ports of the bulkhead. So, back to the box of spare wood where I found a combination of pear and basswood to construct the boxes.

A: Front View
B: Top View. The angle of the sides match that of bulkhead #17.
C: After I had carefully measured out and drilled the holes for the cannons, I carefully taped the boxes with masking tape leaving only the inside of the boxes exposed. I didnt want any paint to get on the edges of the box as that had to be glued against the bulkhead for mounting.
D: Boxes sprayed
E: After the boxes were sprayed black inside, the masking tape was removed and they were ready for installation.

Top View of the boxes.

Side View

Dry-fitted to the keel.
As the whole spiegel assembly was still only-dry-fitted at this point, I now needed to start final assembly and for that to be done the cannons had to be installed. But first, the geschutpoorten had to receive their red frames. Kolderstok recommends using 3mm x 1mm basswood for this which is then painted red, but here I deviated from instructions by going for the 4mm strips.
The second thing that I didn’t want was a brand new Ferrari-red colour. These cannons were essentially blackpowder weapons and anyone who has ever shot anyone of those will know exactly what a messy business it is. After I had sprayed the plank, I waited until it was almost dry and then lightly sanded it with 180 grit sandpaper onto which I have strewn some graphite powder to simulate the root and dirt. It was still unmistakably red, but not bright by any means.

The dull-red strips that I would use to outline the geschutpoorten.
This also meant that the cannons would be the focus point at the lower stern because I had previously decided not to blacken these two cannons. I know there will be many people who disagree with this, but seeing that this was the point at which the Batavia would “become” the Haarlem, I wanted to keep them clearly visible!
After the poorten had received their red borders, the cannons were glued into position, adjusted to their correct depth and angle and left to dry. Finally the lower part of spant #17 could be glued permanently into position on the keel!

Night Time.

From the base of the building board to the centre of the cannons each measured exactly 11.5 cm.
With the cannons installed and the lower part finished it was time to turn my attention to the upper part, spant #17A and #18. As per the instruction manual, all builders of the Batavia paint the portion of spant #17A - which will be visible when spant #18 is installed - black. Spant #18 contains the three windows and the idea is that the black offers a perception of depth behind the windows. Here, I also deviated from all previous builds by deciding to plank the part of spant #17A that would be visible through the windows. I knew that I would be creating a ton of extra work for myself - especially around the joints and curves, but the black just did not appeal to me. After the planking was done, it received a good sanding with 180-grit sandpaper and I finished it with a mixture of 30% pure tung oil and 70% turpentine.

I have used this combination before when restoring my Bowman Swallow steamboat, and it works well. After a while, the finish becomes lighter and the shine also disappears largely. Great care just has to be taken to make sure that the tung oil doesn’t get onto any part that still needs to be glued. With that all finished, spant #18 was glued into position on the upper part of spant #17A. With the top part of the spiegel assembly completed, the whole upper portion could now be glued into the hull and top of spant #17B.

With that the whole Spiegel assembly is finished for the time being.
Thank you very much for watching and for following. Your input and comments are - as always - most appreciated.
Vriendelijk groet - Heinrich
With the arrival of my Exacto knife, it was time to cut open the gunports in the stern assembly. I followed the Admiraal’s recommendation by drilling four small holes in each of the corners of the gunports, after which I traced lines between the holes with the “Exacto”. Then it was simply a case of filing the edges smooth and making sure that the borders line up with that of the rear bulkhead.
After that it was decision time. On the Batavia, the stern geschutpoorten are closed, but I had to think carefully about that. As mentioned before, the Haarlem had at least 32 cannons, as opposed to the 24* of the Batavia, which leaves me 8 cannons short. By installing two rearward-facing stern cannons, at least I would only have to find space somewhere for another 6. So, I decided that the stern geschutpoorten would remain open and the Haarlem would get two stern cannons.
* According to Willem Vos who constructed the Lelystadt replica and the Western Australia Museum, Fremantle, Western Australia, the Batavia originally had 30 cannons: 22 x iron; 6 x bronze and two composite guns. (The composite guns are a most interesting subject and story all on its own.)
The extremely limited space available between spanten 16 and 17 ruled out any possibility of a conventional cannon/rolpaard combination - it was clear that it would have to be “insteek” cannons such as the others on the Batavia. Measuring one of the cannons showed that it would fit into the space available, but how?
Borrowing from Kolderstok, I used their cannon box concept, but modified it considerably. Because of the angle of spant 1#7, I would have to turn the box upside down and match its sidewalls perfectly to that of the spant. I also opted to build a considerably bigger and MUCH more bulky box, so that if I had to, I could manoeuvre it around to ensure perfect alignment with the cut-open gun ports of the bulkhead. So, back to the box of spare wood where I found a combination of pear and basswood to construct the boxes.
A: Front View
B: Top View. The angle of the sides match that of bulkhead #17.
C: After I had carefully measured out and drilled the holes for the cannons, I carefully taped the boxes with masking tape leaving only the inside of the boxes exposed. I didnt want any paint to get on the edges of the box as that had to be glued against the bulkhead for mounting.
D: Boxes sprayed
E: After the boxes were sprayed black inside, the masking tape was removed and they were ready for installation.
Top View of the boxes.
Side View
Dry-fitted to the keel.
As the whole spiegel assembly was still only-dry-fitted at this point, I now needed to start final assembly and for that to be done the cannons had to be installed. But first, the geschutpoorten had to receive their red frames. Kolderstok recommends using 3mm x 1mm basswood for this which is then painted red, but here I deviated from instructions by going for the 4mm strips.
The second thing that I didn’t want was a brand new Ferrari-red colour. These cannons were essentially blackpowder weapons and anyone who has ever shot anyone of those will know exactly what a messy business it is. After I had sprayed the plank, I waited until it was almost dry and then lightly sanded it with 180 grit sandpaper onto which I have strewn some graphite powder to simulate the root and dirt. It was still unmistakably red, but not bright by any means.
The dull-red strips that I would use to outline the geschutpoorten.
This also meant that the cannons would be the focus point at the lower stern because I had previously decided not to blacken these two cannons. I know there will be many people who disagree with this, but seeing that this was the point at which the Batavia would “become” the Haarlem, I wanted to keep them clearly visible!
After the poorten had received their red borders, the cannons were glued into position, adjusted to their correct depth and angle and left to dry. Finally the lower part of spant #17 could be glued permanently into position on the keel!
Night Time.
From the base of the building board to the centre of the cannons each measured exactly 11.5 cm.
With the cannons installed and the lower part finished it was time to turn my attention to the upper part, spant #17A and #18. As per the instruction manual, all builders of the Batavia paint the portion of spant #17A - which will be visible when spant #18 is installed - black. Spant #18 contains the three windows and the idea is that the black offers a perception of depth behind the windows. Here, I also deviated from all previous builds by deciding to plank the part of spant #17A that would be visible through the windows. I knew that I would be creating a ton of extra work for myself - especially around the joints and curves, but the black just did not appeal to me. After the planking was done, it received a good sanding with 180-grit sandpaper and I finished it with a mixture of 30% pure tung oil and 70% turpentine.
I have used this combination before when restoring my Bowman Swallow steamboat, and it works well. After a while, the finish becomes lighter and the shine also disappears largely. Great care just has to be taken to make sure that the tung oil doesn’t get onto any part that still needs to be glued. With that all finished, spant #18 was glued into position on the upper part of spant #17A. With the top part of the spiegel assembly completed, the whole upper portion could now be glued into the hull and top of spant #17B.
With that the whole Spiegel assembly is finished for the time being.
Thank you very much for watching and for following. Your input and comments are - as always - most appreciated.
Vriendelijk groet - Heinrich
Danny Mulders
verslagschrijvers
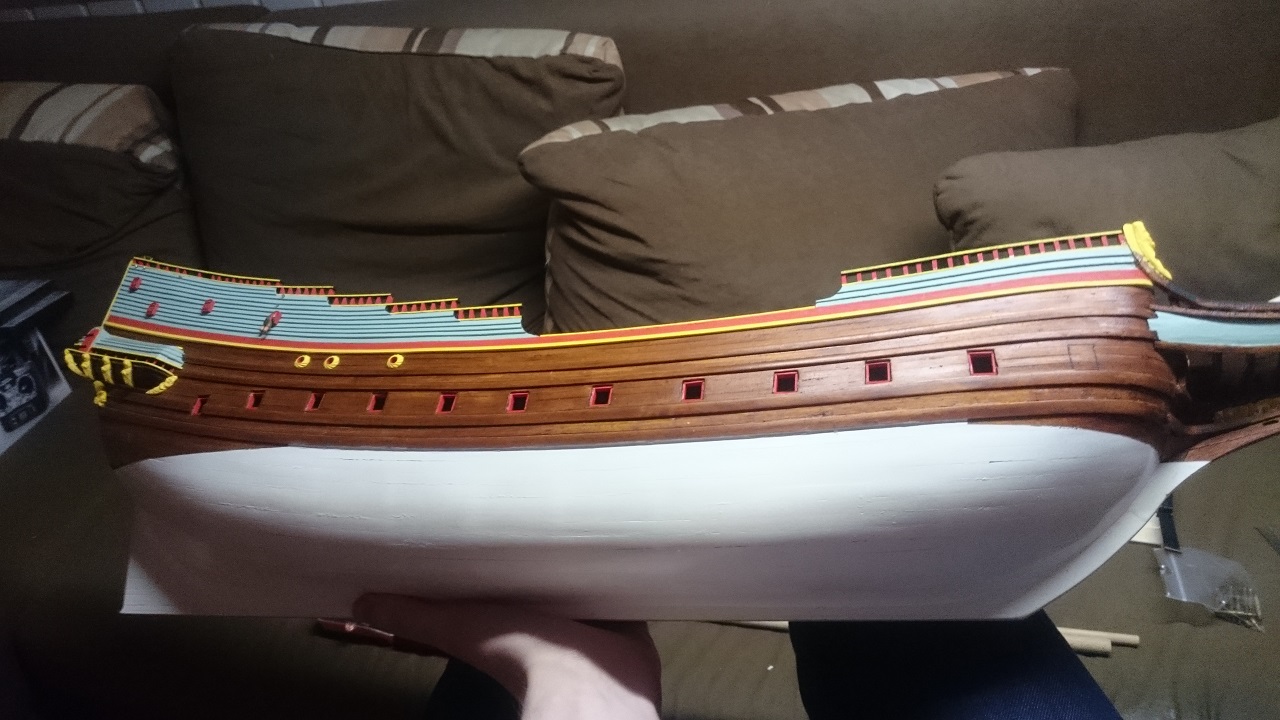
Heinrich, remember that the gunports were originally covered by hatches as well. These hatches were countersunk, so your red planks should be moved in a bit to allow space for them to be able to theoretically close, even though you're leaving them open. Right now you have them flush with the hull planking.
Here's an example of mine:

Here's an example of mine:
 I will have to give that some thought.
@Ronk Hi Ronk. Ja en Nee! Die aantal kanonne verskil en die Spiegel dekorasies is ook heeltemal anders (Hans het reeds iets pragtig ontwerp!). Maar beide skepe is deur die dieselfde skeepsbouer in Amsterdam as VOC skepe gebou. Die Batavia in 1628 en die Haarlem in 1636. Die Haarlem het darem net n baie meer suksesvolle career gehad. Sy het darem vir 11 jaar bestaan voordat sy in 1647 in Tafelbaai gestrand het.
). Maar beide skepe is deur die dieselfde skeepsbouer in Amsterdam as VOC skepe gebou. Die Batavia in 1628 en die Haarlem in 1636. Die Haarlem het darem net n baie meer suksesvolle career gehad. Sy het darem vir 11 jaar bestaan voordat sy in 1647 in Tafelbaai gestrand het.je kan perfect 6 tot 12 kanonnen meer plaatsen op de batavia zonder er veel aan te veranderen
6 kanonnen op het bakdek en 6 kanonnen in de kuil ( verdek ) het open gedeelte voor de midden mast.
moest dat nog niet genoeg zijn kan je er nog eens 6 in de bak zetten.
in oorlogs tijd werden veel oostindiervaarders geupgrade met kanonnen door er gewoon meer in te zetten waar er plaats was zelfs fluitschepen werden voorzien van kanonnen als het nodig was.
je interieur moet je bijna niet aanpassen.
je moet wel rekening houden hoe hoger je het kanon op je schip zet hoe kleiner ze worden dus 24 ponders op de overloop 12 ponders op het verdek en de hogere dekken zoals het bakdek 6 ponders anders ga je het vasa syndroom krijgen dat het top zwaar is. en de dekken worden ook steeds smaller hoe hoger je gaat.
teken zeker eerst goed af waar ze komen te staan en kijk ook of het wel zou kunnen waar je ze plaatst.
teken zeker eerst goed af waar ze komen te staan en kijk ook of het wel zou kunnen waar je ze plaatst.
Beste Modelbouw vriende
It is great to see such a lot of activity on the forum. I really had to search for my build log! Here we go with the weekly update:
I am still continuing work at the stern and the next step was to start the planking the spiegel - and more specifically the “Holle Wulf”. As you all know the Batavia is supposed to have a painting on the holle wulf, but that was not the case on the Haarlem. This is both good and bad - good, because my painting skills do not exist - but also bad, because I wouldn’t be able to “hide” any planking problems underneath paint. So I knew that I had to be very careful when carrying out the planking.
The instructions show that 4mm walnut planks should be used for this. On many of the Batavia builds that I have seen so far, many members builders lay straight planks on the holle wulf as I have shown with the green “plank” on the picture below. But then "instekers” (red pieces) have to be used to fill up the gap between the holle wulf and the lowest part of the Spiegel.

Personally (and this is really just my opinion), the plan drawings show curved planks and I am not fond of the "instekers". The only way that the stern could be done properly (and again this is my opinion and is no reflection on anyone else's builds) was by bending the planks as the Kolderstok drawings show. One of the SOS members from the Czech Republic, @Ondras71, was so kind to give me an indication of how he thought the planks should run. (By the way - if you want to see an excellent build have a look at his Roter Lowe).

For the first plank I chose a 6mm plank which was then bent according to Glenn Barlow’s (another SOS member) method of dipping the plank into hot water, clamping it into position on the plan (so that it follows the correct curvature) and then ironed dry. One the plank has cooled down, it can be removed and will keep its shape permanently.

Using the plan as a template, the spiegel planks are bent accordingly.

First plank is laid down. One of the reasons of going with a 6mm plank was because I could then cut open a large part of the hole for the kolderstok.

On the second plank the top part of the hole for the kolderstok had to be cut open. Whilst I cut the first plank after it was installed on the ship, I cut open the part of the hole on the second plank before it was glued into place.

Laying the planks one by one (Top and bottom pics).

After speaking to *Hans* as I have decided to leave the Bolle Wulf open at this stage and will only do that once the side galleries are in place after the hull planking. This is done so that the planks can be joined accurately to the bottom side of the side galleries.(Picture below).

Thereafter it was just a light sanding with 180 grit sandpaper to see what the stern looked like.


With the stern now completed - as far as I can go up to this point - it is time to turn my attention to the shaping of the bow that will be covered in my next post.
As always - thank you very much for your interest, comments and for following. I trust that you are looking after yourselves and keeping safe.
Vriendelijk groet - Heinrich
It is great to see such a lot of activity on the forum. I really had to search for my build log! Here we go with the weekly update:
I am still continuing work at the stern and the next step was to start the planking the spiegel - and more specifically the “Holle Wulf”. As you all know the Batavia is supposed to have a painting on the holle wulf, but that was not the case on the Haarlem. This is both good and bad - good, because my painting skills do not exist - but also bad, because I wouldn’t be able to “hide” any planking problems underneath paint. So I knew that I had to be very careful when carrying out the planking.
The instructions show that 4mm walnut planks should be used for this. On many of the Batavia builds that I have seen so far, many members builders lay straight planks on the holle wulf as I have shown with the green “plank” on the picture below. But then "instekers” (red pieces) have to be used to fill up the gap between the holle wulf and the lowest part of the Spiegel.
Personally (and this is really just my opinion), the plan drawings show curved planks and I am not fond of the "instekers". The only way that the stern could be done properly (and again this is my opinion and is no reflection on anyone else's builds) was by bending the planks as the Kolderstok drawings show. One of the SOS members from the Czech Republic, @Ondras71, was so kind to give me an indication of how he thought the planks should run. (By the way - if you want to see an excellent build have a look at his Roter Lowe).
For the first plank I chose a 6mm plank which was then bent according to Glenn Barlow’s (another SOS member) method of dipping the plank into hot water, clamping it into position on the plan (so that it follows the correct curvature) and then ironed dry. One the plank has cooled down, it can be removed and will keep its shape permanently.
Using the plan as a template, the spiegel planks are bent accordingly.
First plank is laid down. One of the reasons of going with a 6mm plank was because I could then cut open a large part of the hole for the kolderstok.
On the second plank the top part of the hole for the kolderstok had to be cut open. Whilst I cut the first plank after it was installed on the ship, I cut open the part of the hole on the second plank before it was glued into place.
Laying the planks one by one (Top and bottom pics).
After speaking to *Hans* as I have decided to leave the Bolle Wulf open at this stage and will only do that once the side galleries are in place after the hull planking. This is done so that the planks can be joined accurately to the bottom side of the side galleries.(Picture below).
Thereafter it was just a light sanding with 180 grit sandpaper to see what the stern looked like.
With the stern now completed - as far as I can go up to this point - it is time to turn my attention to the shaping of the bow that will be covered in my next post.
As always - thank you very much for your interest, comments and for following. I trust that you are looking after yourselves and keeping safe.
Vriendelijk groet - Heinrich