Hello Almal
Dit is nou my tweede poging vandag om n bouwverslag te plaas. Vroeer vanmiddag het ek dit op
@ArjenSpiek Arjen se verslag gepost - sorry Arjen! In alle geval zo gaan ik maar voort.
Gemakken geplaast. Toe ek die plaatje aan my moeder stuur - sy is 84 en volg saam - wou sy weet of dit dan "net zo in die oopte gedoen was" ! Die "zwabber-touw"? moet nog gepas word.
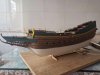
Daarna is die galjoen se nagelbanke en nagels geplaast. Batavia experts sal oplet dat ek 10 nagels op die voorste bank het, in plaas van 9. Die nege, het net nie vir my simmetries gelijk nie.
Bending the walnut for the top railing of the galleon was not an easy exercise - even with a plank bender. As each builder's curvature on the bow will vary to some extent, you can't possibly know if you have done it right, until the ornaments are fitted. Only then will you see if your curvature was correct. You will also notice that I cut away too much of my hull planking at the luizenplecht area leaving me now with an unsightly gap. Here, I still need to figure out a plan.
Luckily Grumpy Old Man #1 fitted perfectly on the railing. At this stage of the build they have just received their primary colour - wash will be added later to see if I can add some definition to the faces.
And now the Grumpy Old Men picture is completed! The two kraanbalken have had the slots for their loopschivjen cut, but are just lying loose on the foredeck at this stage.
Question: Are the loopschivjen supplied with the kit, or must they be scratch-made?
Onwards with the nagelbanken.
From the plans, I cut the drawing in question and then glue that to the piece of the wood is that is to become the rack. Photo copying plans have given me one or two nasty surprises in the past. So, apologies for your plans
@*Hans* Admiraal - after I'm done building, the plans don't like that good anymore.
I first drilled a pilot hole with a hand drill before enlarging the holes in a further two stages. Even then - the walnut was susceptible to splitting open down the middle.
Word vervolg.
")