Another Zwart Zee

Hello All

I am Dylan a Canadian stuck in the Netherlands for the winter doing a refit on a ship in Aalsmeer. When here I needed a hobby so.... ( also I apologies for using english, my dutch is not going as well as I would like)
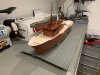
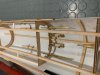
I just started a Zwart Zee build, but this will be something a bit odd.
Its a triple screw! I am taking some small liberties.... Also bow thruster, smoke machine, and sound.

I hope you all enjoy.
at present I am not happy with the railings. I think that they are all coming off to do again. Also I cant get solder to stick to the billings flat stanchions. Any tips?

Thanks so much
Dylan
 

Bijlagen

  • ZZ 1.jpeg
    ZZ 1.jpeg
    164,9 KB · Weergaven: 491
  • zz2.jpeg
    zz2.jpeg
    168,8 KB · Weergaven: 510
  • zz3.jpeg
    zz3.jpeg
    229 KB · Weergaven: 527
  • zz4.jpeg
    zz4.jpeg
    206,1 KB · Weergaven: 465
Hello Dylan, It's always interesting to see the approach of others. Wat type of engines are you going to use? Is it possible to take a picture of the engineroom? Hope that all this machinery is not too heavy and Zwarte Zee is able to float. Regards, Klaas.
 
Hi Klaas
I will post photos tomorrow of the engine mounts and shafts.. they are in epoxy that is setting now. And I have a bad habit of playing with the epoxy as it dries.. so its best to walk away. The engines are 2X 380 and 1X 500 all with 2.5 to 1 reduction.
The battery will be smaller than I wanted for weight savings.
Good night
Dylan
 
Nice speedversion of the Zwarte zee, trying to waterski behind her? or just making shure you win every towingjob?
As for the soldering problem, make the brass shine using some very fine abrasive paper, works every time for me.
 
Thanks Herby63.. on the rails, the solder sticks perfect to the brass, but does not attach to the metal stanchions. I have sanded all and degreased with alcohol. Then used flux with solder. But it just does not stick to the stanchion. Its really odd.
As for the extra shafts.. its more to tow things..
Thanks
Dylan
 
Be careful when towing Dylan. It's not a very stable boat and heeling easily, when towing under an angle. Hope my English is not too cripple and you can understand what I mean. Regards, Klaas.
 
For my tug Smit Finland I made the railing stanchions from polystyreen. Drilled 1 mm holes and put stainless steel rods into the holes. Fixed it with CA glue and paint completed the job. So not soldering at all and after 10 years it's still intact. Rgds Klaas.
 
Hello Klass
"Be careful when towing Dylan. It's not a very stable boat and heeling easily, when towing under an angle. Hope my English is not too cripple and you can understand what I mean. Regards, Klaas."
Thank you fro your message and your english is perfect. My dutch is dismal but I am signed up for night courses.. so hopefully it will improve.
As for the stability, Yes 100%.. I am looking for a tow line release mechanism for this purpose. I have one extra channel on the radio and would like to let go of the tow line with a single switch when the boat is in trouble.

Pascal1977. Thanks for the message as well, yes I think that the stanchions are aluminum, Epoxy seems to stick OK. But I am not so happy. I will paint it with primer and see if its OK or going to be replaced.

So funny enough I did some math on the tug and the engine size to scale (to be honest one of my friends did)


Power is Force*Speed.

Force scales up with Scale^3

Speed scales up with Scale^0.5

So power scales with Scale^3.5


For a 1:90 scale model the power should be decreased with 90^3.5


9000 HP equals 6705 kW.


So the required power in Watts at model scale is : 6705000/(90^3.5) = about 1 Watt. That aint much... But image the small tug sailing at 0.50 m/s and an overall propulsion efficiency of 60%, the thrust would be ( 1 * 0.6 ) / 0.5 = 1.2 N which sounds reasonable to me.


I am fitting a bit more power than one watt, I think the outboard engines are 6 Watts each and the center engine is 10 Watts so I have a total of 22 Watts. This to scale would be almost 200,000Hp. So it will be a bit overpowered. LOL

Thanks for the comments
Dylan
 
For Klaas
Here is the engine foundations. Its not tidy yet and needs more reinforcement for the "wing" engines.
But the engines were placed in the hull high on the bolts. And can now be aligned to the shafts. The wing engines will have a double universal joint, to be sure of alignment. The centre engine has a single universal joint as I am sure I can get it 100% correct.
Under all engines needs to have reinforcement added. I think I will use one of the shipboard epoxys we use called Belzona Super Metal as its pretty amazing stuff.

I am happy that the wing engines sit above the bilge keels. this really helps with the hull stiffness / rigidity.

Thanks
Dylan
 

Bijlagen

  • zz7.jpg
    zz7.jpg
    246 KB · Weergaven: 366
  • zz8.jpg
    zz8.jpg
    211,3 KB · Weergaven: 371
  • zz9.jpg
    zz9.jpg
    227,2 KB · Weergaven: 358
  • zz10.jpg
    zz10.jpg
    205,7 KB · Weergaven: 352
Here is the engine foundations. Its not tidy yet and needs more reinforcement for the "wing" engines.

Kindly request.
As you place the pictures in thump nail format, you can see, that the numbers of readers decrease with the amount of pictures.
It is very irritating to click on each and other picture.
Please use the button "Volledige afbeelding" on the righthand site beside the picture.
To ensure, that the picture is on the wanted place in your article.
Place the cursor on the desired place in the text.
Go with the mouse to the button "Volledige afbeelding" and click on the left hand knob.
The picture will now appear in the desired place in your text.
Hope to have helped you, to get a more convenient approach to our Dutch readers.
 
Laatst bewerkt:
Dylan, Thanks for the engineroom pictures. Do I see Raboesch shafts? With or without rubber seals? If selas with G-ring let them not run dry for testing. The rubber ring needs water for cooling. If nit the rubber will burn and the lipseal becomes hard. Lat picture is upside down. Rgds, Klaas.
 
The build continues after a short trip to canada.

zz12.jpg zz11.jpg zz13.jpg

I was planing on float testng with the engine in on this weekend, but the parts did not arrive.. Lots of other progress.

Lights in the aft mast, railings and painting, and of course a ton of sanding

Oceaneer
 
Klaas Hello. Yes Raboesch shafts, thanks for the heads up. I had added Tef-Gel to them, but will be sure not to overheat them.
Stoompoom, sorry about the earlier pictures. I think this is the correct format now?
Thanks
Dylan
 
Klass, I need some help with the towing winch arrangement, the radio I have is 6 channel.

#1 Rudder
#2 Port Shaft
#3 Stbd Shaft
#4 Center Shaft ( Rotary knob)
#5 Bow thruster
#6 ** was going to be the towing winch, but its just an on/off switch.
So the question can I use the #6 switch to activate a switch on the boat that will change #5 from the bow thruster to the towing winch speed controller?

Any good ideas?
Thanks
Dylan
 
Dylan, Do a test on channel 6 connecting a servo on that channel at the receiver. If the servo reacts in left and right than find out if the switch can be changed for a 3 position one. Any information in the manual about this switch? Another possibility is to combine channel 1,2 and 3 using a V-mixer and an Y-cable. Steering will than activate SB and PS propellers too, making a free channel for other duties. Hope this info is useful. Rgds, Klaas.
 
So the build continues..
Played with the air brush today on the green areas..
air brush good, paint color not good.. Looks like another trip to the shop for darker paint.
zz14.jpg
( I know its sideways,, not sure how to fix)

Anyway this one will be painted in foundation maritime colors... so a bit different

Thanks
Dylan
 
Hi Dylan,
It's Menno crashing into the conversation.

Just to complement you on your Zwarte Zee.
A beaty.
Was, is and always will be.

Don't worry about the colours.
Paint her in the colours to your liking.
It's your model, you have to look at IT.
You like lighter or darker colors, than lighter or darker it is.

Keep up the good work.
You've got a follower extra.
 
Todays fun..
The shaft flexible couplings showed up finally! So the engines are placed in, not adjusted just for getting the shaft length correct and position of the battery pack.
zz15.jpg

I tight inside the hull.. and there is a bit more equipment to go. I dont think we will need much ballast.
But my math is correct, I still need 2-3 Lbs. If too heavy I can decrease the battery packs to one.

Also redid the green for a more dark color. And first coat on the masts..

zz16.jpg
zz18.jpg

It is going to be a big weekend for the build.. lots to do.
Dylan
 
Back
Top